Build It: 6-Pane Decorative Window
If you've ever seen a cute upcycled decorative window project and then searched in vain to find the perfect window for it (on a budget, of course), today's building plan is for you! Amy is here to show you how to build a 6-pane window for all your decorating desires. (And PS: it's designed to fit easy to find glass panes too!) And see all the ways you can use an old-style window here.
Check out all of the All Things Windows goodness here, and share using #AllThingsWindows on social media. Don't forget to come link up your window-related blog posts or Instagram photos at the party, too!
Hi it's Amy from Hertoolbelt back again with a new build plan. People are so creative and come up with the neatest upcycle projects. I have seen some amazing projects that use old vintage windows. However, it can be difficult to get your hands on those vintage windows, depending on the area that you live. Where I live, the basic vintage windows go for about $50 each in the local classifieds…gulp. So what do we do. How about DIY it!

How to Build a Decorative 6 Pane Window
Materials Needed
- 1 – 2″ x 4″ board
- 1 – 1″ x 4″ board
- 8 – 2 1/2″ pocket screws
- 3/4″ or longer brad nails
- wood glue
- 6 – 8″ x 10″ glass panes, about $2 each at Home Depot – optional
- Glazier's Push Points – optional
- 1 – cabinet handle – optional
- sandpaper
- paint/primer or stain
Step 1
Cut the 2 x 4 in the following lengths, 2 x 25 3/16″ and 1 x 25 1/8″. For one of the 25 3/16″, trim down the sides to make it 3″ wide x 1 1/2″ thick (I would cut from both sides to remove the rounded edge). On the other 25 3/16″ piece, trim one side to remove the rounded edge and rip into 25 3/16″ x 1 1/2″ x 1 1/2″. For the 25 1/8″ piece, trim one side to remove the rounded edge and rip the piece into 2 pieces that are 25 1/8″ x 1 1/2″ x 1 1/2″. Save the extra pieces of wood for the dividers.

Set the Kreg pocket hole jig and bit for 1 1/2″ material. Drill pocket holes in the 25 3/16″ pieces. Use wood glue and 2 1/2″ screws, join the window outer frame together.

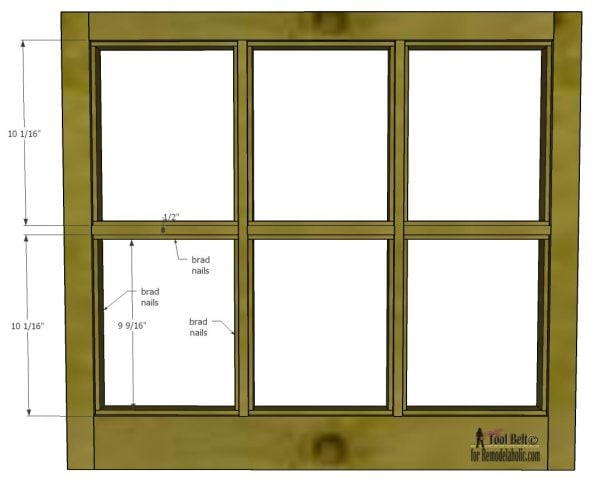
Cut the remaining piece of the 25 3/16″ into 2 pieces that are 20 5/8″ x 1/2″ x 1 1/2″, these are the vertical dividers. Cut the remaining 2×4 end into 3 pieces that are 8 1/16″ x 1/2″ x 1 1/2″, these are the horizontal dividers. Rip the 1×4 board to get 3 long strips 1/4″ x 3/4″. Cut the strips to get 12 – 8 1/16″ x 1/4″ x 3/4″ and 12 – 9 9/16″ x 1/4″ x 3/4″.
Space the 2 vertical dividers 8 1/16″ apart, trim the length to fit. Glue the ends and toe-nail them into place with brad nails.

Set back the 1/4″ strips about a 1/4″ from the front of the frame. Glue and nail the 8 1/16″ strips between the vertical dividers, trim as necessary.

Glue and nail 8 1/16″ strips to the 8 1/16″ horizontal dividers, setting the strips back 1/4″. Space the horizontal dividers 10 1/16″ from the inside of the frame, glue and toe-nail into place. Glue and nail the 9 9/16″ vertical strips to support the horizontal dividers. Allow the glue to dry.
Remove any excess glue, apply wood filler to nail holes, cracks and blemishes and allow to dry. Sand the wood filler and frame until smooth. Stain or paint and prime as you like. (If you'd like to make it look truly old, try this technique from Pretty Handy Girl or this one from Ana White.)
We left about 1/2″ slot in the back to fit, 8″ x 10″ glass panes, pictures or whatever you want.

An easy way to hold the glass and pictures in place, is with glazier's push points. Place the glass in the back on the lip we created with the strips. Use a flat screw driver and slide the push points into the horizontal and vertical support wood, securing the glass into place. The push point tabs are up. The push points can be easily removed to change a picture.

Some old windows included a handle to raise and lower the window, add a cabinet door handle as desired.

Cost Breakdown
- 2×4 pine stud – $2.89
- 1×4 pine furring strip – $2.18
- Glazier Push Points $1.97
- 6 – 8×10 clear glass panes $1.98 each
- 1 – cabinet handle $2
- Total – $20.92 (prices according to my local Home Depot)

Coming up next:
(be sure to subscribe by RSS or email to get updates for every post of All Things Windows)
About Amy Baesler
Amy is the tool lover at Hertoolbelt. On Hertoolbelt, Amy shares DIY furniture plans, handyman tutorials, and craft patterns. She has two pint sized 'helpers' that help fix things around the house and build fun projects.
YOU MIGHT ALSO LIKE.
My Latest Videos
Leave a Reply Cancel reply
Hey there, I am Cassity! Nice to virtually meet you!
This blog is about DIY at its finest. We are obsessed with it and so are you, so while we're working and have nothing to show you of our own projects we show off yours. So submit your projects! More About Us…
Categories
Meet The Team
Remodelaholic is a participant in the Amazon Services LLC Associates Program, an affiliate advertising program designed to provide a means for sites to earn advertising fees by advertising and linking to amazon.com. Please see our full disclosure here.
© 2005-2016 Remodelaholic LLC, All Rights Reserved


Комментариев нет:
Отправить комментарий