How to Replace a Door With a Window How to Replace a Door With a Window

If you have an unnecessary exterior door in your home, you could replace it with a window, allowing for more light in the room. It's a project for an advanced DIYer, but we take you step-by-step below.
Before you begin, check with your local building codes to ensure that it's legal to change out your door for a window. A door that is a vital exit to your home can’t be replaced with a window. If you live in a community that has an HOA, be sure to check the regulations before you begin any changes. Also, know that this project requires some assistance in setting the window in place and making sure it’s level. Ask a family member or friend to help you.
Step 1 - Choose a Window
Choose a window that fits the width of the door frame. Read the product manual provided by the manufacturer of the window before beginning the installation process. Be sure to situate the window so that the opening is facing the proper direction.
Step 2 - Remove the Door and Trim
Remove the trim from around the door that you want to replace. Begin removing the trim at the top of the doorway and work your way to the floor. Once the trim is removed, take the door off its hinges. The remaining door frame should include two jack studs on each side of the doorway and a header across the top.
Step 3 - Build a Bottom Plate
You will need to make a bottom plate that will be placed on the subfloor between the two jack studs. Measure the space between the jack studs. Mark off the length on one of the 2 x 6 boards to create the bottom plate for the space. If the flooring in the room is raised above the height of the bottom plate, cut a rabbet notch out of the bottom plate so that it will fit over the existing flooring. Install the plate onto the subflooring. Use nails to secure the plate into place.
Step 4 - Build a Supporting Wall
Measure four 2x6 studs at the length you will need to support your window. Mark the length with a pencil and cut the studs with your table saw. Place two studs against each of the jack studs on either side of the opening. Secure the studs to the bottom plate and jack studs with nails. Secure the other two cut boards so that they sit vertically along the bottom plate, equal distance apart from the jack studs. Measure and cut a sill plate to run across the top of the supporting studs.
Step 5 - Sheath the Exterior Wall
Use your plywood to sheathe the outside of wall frame you built. Measure and cut the plywood to size and secure into place with nails. You will need to protect the perimeter seams around the plywood with 4 inch self-adhesive flashing. Carefully apply the flashing so that all of the seams are covered. The vertical areas on either side of the opening to the window will also need to be protected. Attach tarpaper so that it overlaps the flashing that you applied to the sheathing seams.
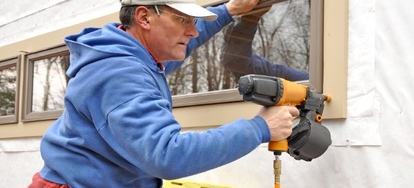
Step 6 - Position the Window
Adhesive caulk will secure the window once it's in place. Apply a liberal amount of the caulk to the front of the upper area, along the sides, and across the bottom of the flange. Place the window into the space, setting the flange under the house exterior siding. Ensure that the window is centered in the space and is sitting level. If the window is not level, push shims into the space between the window and the frame to sit the window properly. Secure the window to the frame with roofing nails. Hammer the nails through the holes in the flange.
Step 7 - Finish the Exterior
You will need to finish the exterior to enhance the appearance of your newly installed window. This will also protect your plywood sheathing from the elements. Cut and install siding to cover the window flange and sheathing.
Step 8 - Insulate the Interior Space
Apply expanding spray insulation in the space between the window and the frame. Install insulation between the studs on the interior space. Attach a vapor barrier over the insulation and secure it in place with a stapler. Install the drywall over the vapor barrier.
Step 9 - Install Drywall
Measure and cut drywall to cover the space under the window. Mud the seams and apply tape over the mud to secure the drywall in place. Once the mud is dry, lightly sand over the surface until it's smooth.
Step 10 - Install the Window Trim
Measure and cut your trim to fit around the window. The ends of the trim lengths will need to be cut at 45-degree angles for them to fit together properly. Set the pieces into your miter box to make the cuts. Secure the trim in place with finishing nails.
Step 11 - Paint the Wall Space
Apply primer to the newly installed drywall to get it ready for your application of paint. Once the primer is dry, paint the newly built wall to match the other wall space in the room. Allow the paint to dry thoroughly and, if necessary, apply a second coat.


Комментариев нет:
Отправить комментарий